KOTH - How to Play
- Barcode Archive
- May 22, 2025
- 6 min read
Warcodes KOTH - How to play
Warcodes has 1 main game mode that is the second most important feature of this mobile game and that is KOTH (King of the Hill). KOTH gameplay is based around Location domination. There are 5 Locations to dominate as a new player and 7 Locations to dominate as an experienced player. As your account gains more experience points through battle, you’ll be able to dominate more than 1 Location at a time. When you reach the experienced player KOTH lobby you’ll be able to dominate all Locations if you really want to.
In this article we’ll explore the best practices when battling your creature at each location as it levels up.
First let's spawn in a brand new creature. We’re going to go with a Radiation type from https://www.barcodearchive.com/radiationcodes
Find specific creature types at https://www.barcodearchive.com/exploretheelements

Awesome! We’ve spawned in a Radiant Sentinel. This creature is considered a 221 Star Code Creature; more on Star Codes here: https://www.barcodearchive.com/post/warcodes-build-advice-and-secondary-weapon-suggestions
Its main attack is Radiation, rolls a D8 for accuracy, and 2 D8’s for damage. It rolls a D6 for agility and has 53 Health. We would say Radiant Sentinel has balanced stats. At level 1 we can equip it with a secondary attack or go all in on its main attack using the Battle Runestone. Because it rolls 2 D8’s for damage, the Battle Runestone might not be the best choice and because it resists poison, we might equip Radiant Sentinel with a Light Type Secondary Attack. A secondary attack type of Fire might also be a good choice.
At level 1, Location 1, using our creatures' resistances and weaknesses are usually not super important. Sometimes, other players will equip their creatures with items right away which may make things a bit more difficult but we found that this isn’t usually the case. Equipping the wrong item at level 1 can make your creature useless later. You can always remove items and re-do your creatures build, the only downside to this is if you really like the way your creature looks it may change it’s appearance based on the item you add. You can always uncheck the “Apply Image Transformation” box when equipping new items to preserve your creatures appearance.
Our creature's first battle is against Valariel.

As you can see they are quite even in stats and their weaknesses and resistances won't affect each other.

Radiant Sentinel wins and gains exp.
Just as quickly as it won, another player uses Radiant Sentinel’s weakness to take Location 1. They attacked with Die Duplicor, a Magic Type, which is Radiant Sentinels Weakness.

Radiant Sentinel is having trouble against this Level 1 Ironclad Guardian because it has 2 attacks. Let’s give Radiant Sentinel its own Light Type Secondary Attack.


Radiant Sentinel now has a Secondary Attack that uses a D8 for accuracy and 2 D4’s for damage. This should give it a fair chance against other creatures with 2 attacks.
Radiant Sentinel didn’t have any luck beating Ironclad Guardian but a good idea is to continue to attack at level 1, even if you lose every battle, because your creature will gain experience after each battle and reach level 2 quickly. This will allow you to equip its first item that will give your creature an edge against the competition.
Also at level 1 and 2 the cost to heal your creature is exceptionally low.

Now that Radiant Sentinel is level 2 it can no longer battle at Location 1.
At location 2 you’ll need more damage to keep up with your opponents. There are many good items to use here and none of them are correct but there are a lot of bad items you don’t want to equip. More on items here: https://www.barcodearchive.com/post/what-are-the-best-items-in-warcodes
We could either equip the Large Celestial Shard, the Aegis Stone, or the Wrathstone. Because we want Radiant Sentinel to be balanced so it can win against most creatures, we’ll equip the Large Celestial Shard. We will equip the Aegis Stone at a higher level when it’s needed.


With the Large Celestial Shard equipped, Radiant Sentinel will win most battles because it will use 3 D8’s when attacking. When attacking a creature with resistance to Radiation, it will still attack with the normal 2 D8’s. The toughest opponents will be those who attack with Radiant Sentinel’s weakness Magic and opponents who have resistance to Radiation and have equipped the Aegis Stone to their creature.


Radiant Sentinel lost the Location to Flexia because they are attacking with its weakness Magic. This opponent won with no other items equipped.
After attacking and defending a few more times, Radiant Sentinel reaches Level 3 and can no longer battle on Location 2 or 1. As your creature levels you can only battle on higher locations, this keeps the game fair for new players.


At level 3 we want to start thinking about what we want our creature to do best. We are building Radiant Sentinel as a balanced fighter so we are going to equip the Aegis Stone. This is arguably the best item in the game that you’ll need on all of your creatures to survive in the final Locations.
Aegis stone will stop Radiant Sentinel from losing against Poison Type cannon builds. (Cannons are creatures that use 5 D12’s or D10’s when attacking.) It will also guarantee the win against any regular Poison Type creatures.
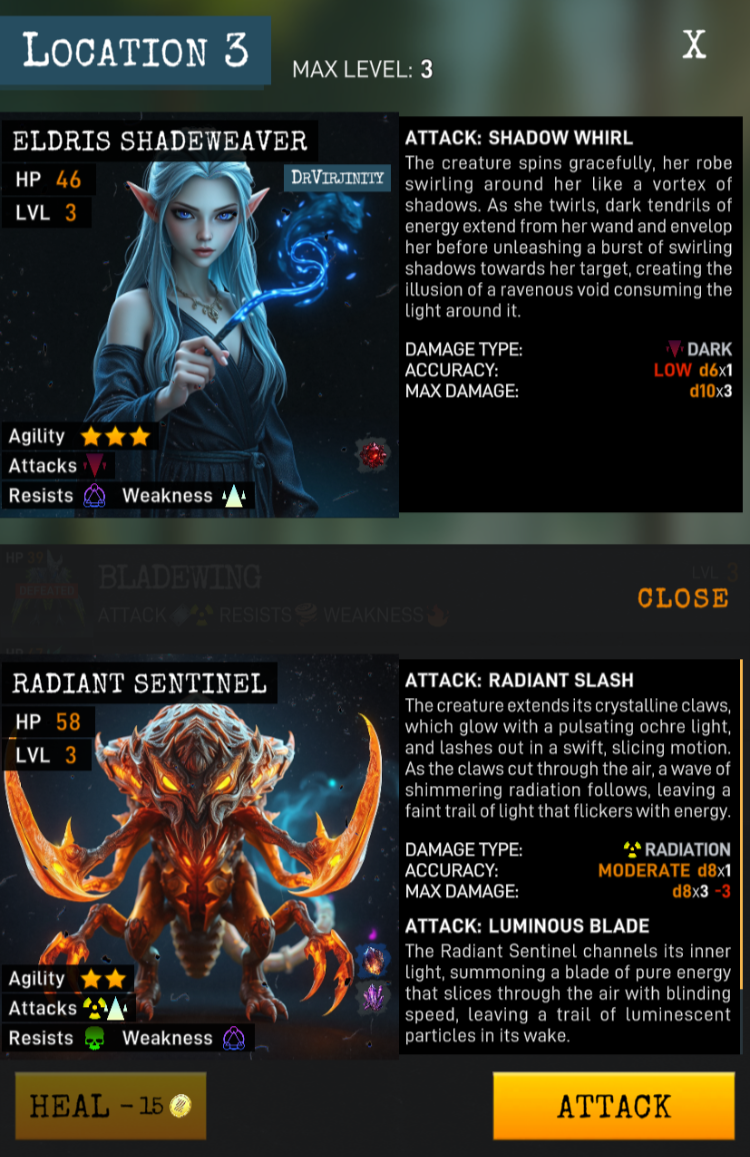
Radiant Sentinel wins its first battle against Eldris Shadeweaver because we have equipped it with the correct items and our opponent equipped Eldris Shadeweaver with the Flareheart Crystal which decreases its Health in exchange for an extra attack die. (This may be a good option for creatures with high health and low attack damage because the Large Celestial Shard removes 3 damage from your creatures total attack roll).

Attacking a higher health creature gave Radiant Sentinel some trouble but this is mainly due to RNG (random number generation) which dictates hit vs miss and damage amounts.
Attacking a creature with Magic Type, Radiant Sentinel’s weakness, and 3 attack dice also gave some trouble but Radiant Sentinel was able to win after some losses due to the balanced build we are creating.
Now Radiant Sentinel is level 4! We can equip another item, because we want to boost Radiant Sentinels win rate against regular opponents we’ll equip it with a Large Eyestone.
This will add 1 to Radiant Sentinel's total accuracy roll. Basically, Radiant Sentinel will hit more and miss less.
So far we have increased Radiant Sentinel's primary attack max damage to 21 (24-3), gave it a stronger resistance to poison, and increased its primary attack max accuracy from 8 to 9. It also does additional Light Type max damage of 8, making its total max damage in 1 turn 29 (21+8).

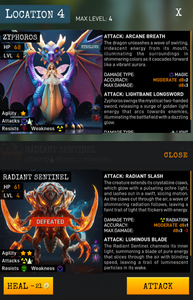


At Location 4 Radiant Sentinel runs into Zyphoros. This is an interesting matchup because both creatures use the other's weakness. After many battles Radiant Sentinel can’t seem to win and after checking Zyphoros items, our opponent equipped it with an Eagle Stone. Eagle Stone rolls an extra dice for each attack and uses the higher value at the cost of -1 on your creature's Agility roll (chance to dodge). This is a great item to have in this specific situation and to give your creature a bit more luck when it comes to the RNG. Definitely consider the Eagle Stone over the Large Eyestone if your creature already has 3 Star or 2 Star (D10 or D8) accuracy.
At Location 4 healing becomes expensive so choosing the right items is crucial to leveling your creature to level 5. You’ll want to have many creatures with different builds and Types to continue to battle, win, and pay for your creatures healing.
We are smashing Radiant Sentinel into losing situations for the purpose of this How to Play - KOTH. We switched our Large Eyestone for an Eagle Stone to see if it made a difference when losing and it DID NOT because by the time your creature reaches Location 4, resistances become a huge game changer in whether it wins or loses.
Your level 4 creatures can actually win at higher locations consistently now with the above builds. At level 5, for this build, you’ll want to equip the Wrathstone to dominate against creatures with a weakness to your creature's primary attack or a Hearthstone that adds an additional resistance type to your creature and a 10% health increase at the cost of -1 max agility. This is why the Large Eyestone may be the better choice over the Eagle Stone.


We made it to Level 5 and can now only compete on Location 5, 6, and 7. It’s important to remember you can remove and equip items whenever you want so rebuilding a creature that never see’s battle to strengthen your team is always an option!
Thank You for reading!
If you’re looking for specific creature types visit: https://www.barcodearchive.com/exploretheelements


Comments